
by Rick DeMille aka Darklighter
Why a 2nd Edition?
I wrote an article for the Megahaulin blog in 2015 about strategy considerations surrounding the reshuffle in Star Realms. “The ‘reshuffle’ in Star Realms,” I wrote, “produces some unique strategy considerations, particularly in the on-line game where you must play all cards in your hand.”
Things changed.
Following the Colony Wars update to the Star Realms app, you no longer had to play all cards in your hand, which is consistent with the physical game rules. You now have the option to “End Turn” before playing all your cards.
So, while many of the principles in my 2015 article are still relevant, other parts of that article no longer apply.
Finally, after hundreds of requests – mostly from myself – I updated this article given that the app no longer forces you to play all your cards.
Basic Principles
The “reshuffle” in Star Realms produces some unique strategy considerations, particularly when you will reshuffle mid-turn.
For example, playing a draw card (e.g., Corvette) when your draw pile is empty will cause your deck to reshuffle during your turn. Any cards in your current hand will not be included in that reshuffled deck. Instead, the cards in your current hand will sit in your discard pile until the next time your deck reshuffles. In other words, when you reshuffle during your turn, the cards in your hand are essentially “lost” for one deck; you will have to wait until your deck reshuffles again to have access to those cards.
This can be good when you are “losing” starter cards for one deck; for one deck those starter cards aren’t diluting your deck. But this can be a bad thing when “losing” stronger cards. Let me set the stage with two examples.
Example 1:
Your Hand: 4 Starters, Corvette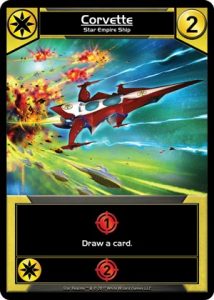
Draw Pile: Empty
Discard Pile: Battle Blob, Blob Destroyer, Ram, Freighter, 6 Starters
Example 2:
Your Hand: Battle Blob, Blob Destroyer, Ram, Freighter, Scout
Draw Pile: Empty
Discard Pile: Corvette, 9 Starters
In both examples you can draw a card, which would trigger a reshuffle during your turn because your draw pile is empty. Assume in both instances you would draw a Scout after reshuffling.
So, in Example 2, after you draw a Scout, your hand includes the Battle Blob, Blob Destroyer, Ram, Freighter, and two Starters. Because you triggered a reshuffle during your turn, those cards will go to your discard pile at the end of your turn and you won’t have access to them until your deck reshuffles again. You have essentially “lost” Battle Blob, Blob Destroyer, Ram, and Freighter for one deck. Not good; losing that much damage from a deck could be costly. As counter-intuitive as it might seem, perhaps it would have been better not to play your Battle Blob so as not to trigger a reshuffle in this instance. You are losing 8 damage by not doing so, but you are potentially losing at least 11 damage by losing Blob Destroyer and Ram from your next deck. It’s a judgment call depending on your situation.
On the other hand, in Example 1, after you draw a Scout, your hand includes five Starters and the Corvette. As explained, because you triggered a reshuffle during your turn, these cards are essentially lost for one deck and you won’t have access to them until your deck reshuffles again. In this case, though, it’s a good thing because the cards you lost are Starters…that’s 5 starter cards that won’t be diluting your next deck, which will make it more likely to combo your Blob cards. That’s why we scrap starter cards…to make our decks denser with non-starter cards and increase the chances of power combos. By “losing” 5 starter cards for one deck, you have, in a way, temporarily scrapped those starters for one deck.
With those basic principles in mind, your actions leading up to the reshuffle can make a difference in the outcome of the game. This article discusses various strategy considerations a player should take into account when approaching the reshuffle. Some of these considerations will seem obvious. Other considerations discussed in this article involve situations you may rarely encounter, but the goal of this article is awareness…to help make players aware of what they should consider each time their deck is about to reshuffle.
At a high level, the article discusses the following situations:
- Before reshuffling, you should still…
- Avoiding the unwanted reshuffle
- When to avoid the reshuffle
- Forcing the reshuffle
- Your opponent’s reshuffle
Before Reshuffling, You Should Still…
Even though you can avoid reshuffling mid-turn, in most instances you won’t. But if you are going to reshuffle mid-turn, there are some things you should consider before triggering that reshuffle.
- Scrap before the reshuffle
The most obvious answer is that if you have “scrap” cards that allow you to scrap cards in your discard pile, play those cards before playing your draw card that will trigger a reshuffle. Naturally, once you play the draw card and cause a reshuffle, you no longer have a discard pile and you will have to scrap cards in your hand. Every starter you scrap before the reshuffle is one less starter diluting your new, reshuffled deck.
- Use economy before the reshuffle…sometimes
Consider using your economy before the reshuffle. Any card you purchase before the reshuffle will obviously be included in your reshuffled deck. If you play your draw card and trigger a reshuffle before using your economy, whatever you buy will go to your discard pile and will not be usable until your next reshuffle.
Now, there may be reasons you should wait until after the reshuffle to make your purchase. For example, if you have $6 and the Dreadnaught is in the trade row, it may be worth it to play your draw card, triggering reshuffle, in the hopes of getting $1 more to purchase the Dreadnaught.
But the point is that any time you have a card that is going to cause a reshuffle during your turn, you should always at least consider whether it makes sense to use your economy before reshuffling.
- Timing the reshuffle
There are times you may not want to avoid the reshuffle mid-turn, but watch for situations when you can control the timing of your reshuffle.
Here’s an example:
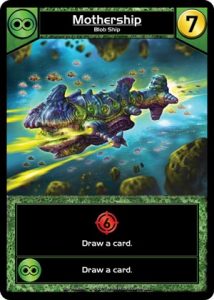
Your Hand: Mothership (draw one card, ally ability to draw a second card), Blob Fighter (ally ability to draw one card), a Freighter (4 economy), and two Scouts (1 economy each).
Draw Pile: 1 Scout.
Trade Row: The highest cost card in the trade row is a Dreadnaught (cost 7).
Your Play: If you play both Mothership and Blob Fighter, your hand is going to cause you to draw three cards, causing a reshuffle since your draw pile
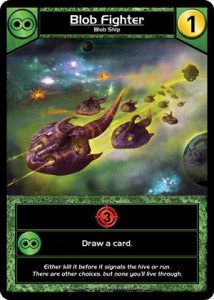
only has one card. However, if you play your Mothership first along with your Freighter and two Scouts, you will draw only one card – a third Scout and last card in your draw pile – which would give you $7, enough
to purchase the Dreadnaught. Then you play the Blob Fighter, triggering the ally abilities of both the Mothership and Blob Fighter, to draw two more cards. This will cause a reshuffle since your draw pile is
empty. You might even draw the Dreadnaught you just bought.
In this example, if you had played the Blob Fighter before playing the Mothership, you would have drawn three cards all at once (one from the Blob Fighter’s ally ability and two from the Mothership), which would have caused a reshuffle because there was only one card in your draw pile. You still would have been able to purchase the Dreadnaught, but not until after you reshuffled, so you would have to wait until the next reshuffle before being able to play it for the first time. So, by timing the reshuffle in this way, you essentially got access to the Dreadnaught one deck earlier than had you purchased the Dreadnaught after the reshuffle.
While you may not always want to avoid the reshuffle, controlling the timing of the reshuffle, if possible, can give you more options on your turn.
- Draw before cycling
If your hand includes a “discard-first” cycling card (e.g., recycling station, orbital platform) and a draw card, either of which can cause a reshuffle, consider using your draw card to trigger the reshuffle and your cycling card after the reshuffle. This really depends on the situation, but it’s something to consider.
When you cycle before the reshuffle, the starter cards you cycle will go to your discard pile, and then be included in the reshuffled deck. You may draw the starter cards you just cycled! On the other hand, if you can play a draw card that causes a reshuffle, then play the cycling card after the reshuffle, the starter cards you cycle will not be included in new reshuffled deck.
Note: This doesn’t apply to “draw-first” cycling cards (e.g., Frontier Hawk, Imperial Smuggler, Captured Outpost).
- Don’t “Play All”
Generally, it’s probably a best practice to never click the “play all” button. Of course, sometimes clicking the “play all” button is harmless. Other times, clicking the “play all” button can cost you, particularly when timing can be important, as it often is right before a reshuffle. For example, in situations when it makes sense to buy something before playing your draw card that will trigger a reshuffle (so the card you buy will be included in the reshuffled deck), you may miss that opportunity if you click the “play all” button.
6. Missions
Missions can play a factor in what you do before a reshuffle. When the base you need to complete a mission is in your discard pile, while all the ships you need for that mission are in your draw pile, you might have to wait a while before you reshuffle everything together and even have a chance to draw that base and ship together to complete a mission. When approaching a reshuffle, there are things you can do to avoid separating the cards you need for a mission between your discard pile and draw pile.
Most commonly, I have seen this come up when deciding whether to play a base I need for a Mission on the turn before I am going to reshuffle.
Example:
Your Hand: blue base, 4 scouts
Draw Pile: No cards
Discard Pile: 15 cards including 3 blue ships

Mission: Monopolize (have a blue base and ship in play at the same time)
You won’t trigger a reshuffle mid-turn, but you’re about to reshuffle after your turn since your draw pile is empty. If you play your blue base and your opponent destroys it on their next turn, your blue base will go to your discard pile while all your blue ships are in your 19 card draw pile. Your blue ships and base are separated for at least 3 turns (unless you have something like Repair Mech) until you reshuffle again.
If instead, you had elected not to play that blue base right before a reshuffle, then your new draw pile would include your blue base and ships, giving you a decent chance to draw the blue base with one of those blue ships over your next 3 turns.
This same principle applies to many of the missions. What your mission is can affect what to play (or not play) right before your reshuffle to increase the chances of drawing the cards you need together in one hand.
Avoiding an Unwanted Reshuffle
1. Don’t play all your cards
This has already been mentioned. If playing that Corvette would cause you to reshuffle mid-turn, but you don’t want to reshuffle mid-turn, then just end your turn without playing the Corvette.
Avoiding playing that deck flipper with the “End Turn” is not something I do often but you should always have it in your mind. -aldaryn
2. Topdecking
But what if you want to play that Corvette and avoid the reshuffle? There are a few cards that make that possible: The topdeckers (e.g., Megahauler, Blob Carrier, Customs Frigate, Central Station, etc.)
If you have a Dreadnaught you want to play but no draw pile, just use a topdecker (if you have one) to put a card on top of your draw pile before playing Dreadnaught.
You might well ask, “Isn’t this a no-brainer. Wouldn’t I want to top deck a card in this situation regardless of the number of cards in my draw pile?” In most situations, yes. However, this is more of a consideration when you would otherwise not have topdecked anything. We have all encountered situations when there are no cards we want to buy or gain.
For example, if you have Customs Frigate but no card cost $4 or less you are interested it, but you want to avoid the reshuffle, then just topdeck an Explorer and draw it with your Dreadnaught to avoid the reshuffle, even if it’s a situation when you otherwise would not have bought or gained anything. You can just scrap the Explorer, but you save the Dreadnaught any the other cards in your hand from being lost from the next reshuffled deck.
This is also an example of why it’s important to pay attention to the timing with which you play your cards.
3. “Atypical” Use of Optional Abilities
Some cards have optional abilities. In some instances, you can avoid triggering a reshuffle by modifying if/how you use a card’s optional ability.
Sometimes if I only have one card left in my deck, and I play Ark, I might only scrap one card. -Crshaner
Typically, if you can scrap 2 cards with Ark, or cycle 2 cards with Recycling Station, or draw a card to scrap a card from hand with Machine Base, you will. But watch for instances when you should modify normal practice to avoid triggering the reshuffle.
When to Avoid the Reshuffle
So, while it’s possible to avoid triggering a reshuffle mid-turn, should you?
It really is case-by-case, but I will share the though process I go through in deciding whether to trigger a reshuffle during my turn.
As an aside, much of the time I could avoid triggering a reshuffle during my turn, I don’t. But there are absolutely instances when you should.
Is it worth it?
If you trigger a reshuffle mid-turn, your current discard pile will become your new draw pile, minus the one or more cards you will draw. Everything in your hand will go to your new discard pile and you won’t have access to any of those cards until the next time you reshuffle, which could be 2-3 turns.
The two basic questions I ask are, 1) “Is it worth losing the cards in my hand from my next deck?” and 2) “Do I want my discard pile to become my new draw pile minus the cards in my hand?”
The challenge in answering these questions is that there are no absolute truths. It depends. Listed below are various factors to consider, and whether they lean towards or against choosing to trigger a reshuffle.
Factors Leaning Against Triggering a Reshuffle Mid-turn
- Most of your strong cards are in your hand and your discard pile is weak:
- If you reshuffle mid-turn, your strong cards will go to your discard pile at the end of your turn and your new draw pile will only include the cards that were in your discard pile.
- Your opponent has a lot of bases and your base-killing cards are in your hand:
- If your opponent has a lot of bases you want to be able to have cards each turn that can destroy those bases. If triggering a reshuffle mid-turn could lose you some base-killing cards for 2-3 turns, you may want to avoid triggering that reshuffle mid-turn.
- For a Mission:
- For most missions there is a combination of cards you need to play together, such as a base and ship of a certain faction. You don’t want to separate those cards between your discard pile and draw deck. If the base you need is in your hand and the ship you need is in your discard pile, if you trigger the reshuffle mid-turn you could be separating those cards for multiple turns. It may be better not only not to play your base, but not to trigger the reshuffle either so that base and ship are both in your draw deck; you’ve given yourself a chance to draw them together.
Factors Leaning in Favor of Triggering a Reshuffle Mid-turn
- Your hand is full of starters:
- It may be worth triggering the reshuffle mid-turn because then the four starters in your hand won’t be shuffled into your new draw pile.
- $1 short or 1 damage short:
- Especially early in the game, it may be worth triggering the reshuffle even if your new draw pile will be weak to purchase a valuable card. Leaving opponent bases in play can lose you the game; it may be worth triggering a reshuffle when you otherwise wouldn’t if you are desperate to kill that base…but first consider your chances of drawing that needed damage.
- Scrappers in your discard pile:
- Have you ever cursed the sky when you top-deck your scrappers? Consider this scenario…you have a Gambit that lets you draw a card. On your first turn with 4 scouts and a viper, you bought Mining Mech. Now it’s your second turn with 4 scouts and a viper, and you buy Repair Bot (don’t spend the other $2 yet). Your discard pile has 7 cards…5 starters, Mining Mech, and Repair Bot. If you use that Gambit to draw you will trigger a reshuffle of those 7 cards and then draw one of them. Odds are you will draw a starter, leaving 6 cards in your new draw pile for your next hand, 2 of which are scrappers, and your current hand of starters will go to your discard pile. You’ve increased the chances of drawing those scrappers when you have a discard pile to scrap from. This is a technique I’ve employed, and I’ve seen employed by other players. Note: It doesn’t just apply to scrappers. For example I’ve seen players buy an early Freighter and then trigger the reshuffle when their discard pile has 6 cards to basically guarantee drawing Freighter that turn or on their next turn, which can be particularly helpful in grabbing high cost cards from the row before your opponent.
- Stacking the deck:
- Consider the following strategy tip shared by aldaryn on the Fan-Created Facebook Page…
- If you play second and have a gambit that gives a card draw (ideally 1), and there’s a hot expensive item in the trade row, this gives you an edge to catch up with player 1 in grabbing it first. On your first turn, you will likely buy cards for Trade. On turn 2, do the same thing, but before the turn is up, draw a card. Ideally, you’ll draw a scout, but most importantly, your current hand of Scouts/Vipers will not hit the reshuffle, making your deck you are about to draw from a tighter mix of those new 2+ trade cards.
- The card that would trigger the reshuffle is too good:
- In hand with 4 scouts and a Corvette it may be worth triggering the reshuffle mid-turn. But now swap that Corvette for a Dreadnaught. Yes, you lose 4 scouts, but you also lose a Dreadnaught. Often not worth it.
- For a Mission:
- I mentioned above that you may want to avoid a reshuffle mid-turn if cards you need for a Mission are divided between your hand and discard pile. In contrast, if all the cards you need for missions are in your discard pile and none are in your hand, then by triggering the reshuffle mid-turn you can essentially filter out the cards in your hand and increase the chances of drawing the cards you need for a mission on the same turn.
- Your discard pile is small:
- If your discard pile is 6 cards, then if you trigger the reshuffle mid-turn you will draw 1 of those cards and your new draw pile will be 5 cards, which is one turn. So, it would only be one turn before you reshuffle again. When considering whether it’s worth losing the cards in your hand from the next deck if you reshuffle mid-turn, the size of your discard pile matters. The smaller the discard pile the less risk.
- You have a lot of draws:
- It’s one thing to avoid the reshuffle mid-turn by just not playing one card that would trigger that reshuffle; it’s another thing if you would have to not play 4 cards, each of which would trigger a draw, to avoid the reshuffle. In that instance it may be too costly to not play any of them, even if that means losing a few strong cards in the next reshuffle.
These are just a few of many possible considerations. Often, more than one of the above situations will exist at the same time, and you’ll have to weigh them.
The general principle is that if you have the option of triggering a reshuffle during your turn, look at your discard pile and hand to make sure it is worth that discard pile becoming your next draw pile minus the cards in your current hand. In most instances you should trigger that reshuffle in my experience, but I can guarantee you there are some occasions when you are better off ending your turn before playing that card that would trigger the reshuffle.
Forcing the Reshuffle
There are situations when you might want to force the reshuffle. Let me illustrate with a situation I encountered:
My Hand: Imperial Frigate (among other cards)
My Discard Pile: All of my strong cards were in my discard pile.
My Draw Pile: Five Scouts and a Corvette
My Play: It was my turn, and I could see from my draw pile that my next hand wouldn’t be that great (Five Scouts or Four Scouts and a Corvette). My deck was a yellow deck, so it wasn’t a situation where I normally would have scrapped the Imperial Frigate. But I saw an opportunity to force my deck to reshuffle during my next turn. As we discussed before, when your hand includes mostly starters, triggering a reshuffle during your turn can be a good thing because then those starter cards are “lost” for one deck. Losing starter cards makes your deck denser with non-starters, which increases the chances of combo-ing good cards together. I recognized that if I scrapped the Imperial Frigate to draw a card, I would either draw a Scout, leaving my draw pile with five cards including the Corvette, or draw the Corvette which would in turn draw a Scout, leaving my draw pile with four cards. Either way, my next hand would trigger a reshuffle during my turn. But now when my deck reshuffled, it will have four less Scouts diluting my next deck. So, I scrapped the Imperial Frigate and drew a Scout. The Scout I drew didn’t help my current turn, but now my next hand, with mostly starter cards, would trigger a reshuffle during my next turn. Had I not forced a reshuffle a turn early by scrapping the Imperial Frigate, my next reshuffled deck would have been diluted by four more Scouts. I couldn’t avoid my next hand being weak, but I increased the chances that my next hand after that would be strong.
This is a fairly specific example, but there are other ways this can play out. The point is that forcing an earlier reshuffle can prevent some weaker cards from being included in the next reshuffle, creating a new draw pile that is less diluted by those weaker cards.
Your Opponent’s Reshuffle
There are also things to consider when your opponent is going to reshuffle mid-turn. Consider that your opponent has 5 cards left in their draw pile, which the app lets you see. Those cards are a Dreadnaught and 4 scouts, so your opponent will trigger a reshuffle during their next turn if/when they play the Dreadnaught.
Here are a few things you should consider when your opponent is going to reshuffle on their next turn.
1. Make them discard
Many people don’t scrap a Survey Ship, Falcon, Hero Admiral Rasmussen, etc. to make their opponent discard unless they can do so in combination with other cards to make them discard multiple cards all at once. It’s often not worth scrapping these cards by themselves to make your opponent discard just a single card.
An exception to consider is when your opponent is going to reshuffle during their next turn. For one, you may be denying them the ability to purchase a particular card before they reshuffle by making them discard a Scout. Secondly, by sending a starter to their discard pile before they reshuffle, you are adding a starter to their next draw pile, effectively “watering down” that new draw pile, to quote Crshaner.
2. Leave opponent’s base in play
To be clear, it’s typically not a good idea to leave an opponent’s base in play if you can destroy it. However, there will be rare instances when your opponent is at the end of their deck when you might want to wait a turn to kill that base.
Consider two scenarios. Scenario 1: If your opponent is close to reshuffling, then if you kill a base it will be reshuffled back into their deck soon and they could potentially re-draw that base quickly. Scenario 2: On the other hand, if your opponent just reshuffled and won’t reshuffle again for several turns, then if you kill that base it will be several turns before they have a chance to redraw it.
There are times when, if you wait a turn to kill an opponent’s base, you switch from Scenario 1 to Scenario 2.
Example:
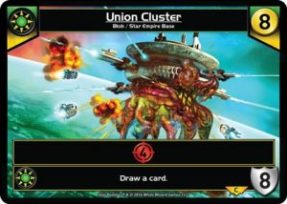
Opponent’s Base In Play: Union Cluster
Opponent’s draw pile: 5 Scouts
It’s my turn…
After my opponent’s next turn, they will reshuffle their deck. If I kill Union Cluster on my current turn, I will be killing it before my opponent reshuffles, so Union Cluster will be reshuffled into their new deck. If I wait a turn to destroy Union Cluster, then I will be killing it after my opponent reshuffles, so it will sit in their discard pile until they reshuffle again, which could be a while.
Since my opponent doesn’t have any cards in their next hand that would ally Union Cluster, it might make sense to take the extra 4 damage from leaving Union Cluster in play on my next turn to make them lose Union Cluster to their discard pile for several turns.
But a WARNING… You better be sure you’ll be able to destroy Union Cluster on your next turn!
Again, I have found that it’s rarely the right move to leave an opponent’s base in play, even in Scenario 1, but there have been a few instances when it did make sense.
Closing Remarks
Triggering a reshuffle during your turn can be good if it means losing starter cards from your next reshuffled deck, but by the same token it can be bad if it means losing strong non-starter cards from your next deck. There are seemingly an infinite number of possible situations you can encounter in Star Realms, which is part of what makes it great. So, you may have read this article and thought, “Well, in situation X, Y, Z I would do something different.” Of course. This article doesn’t, and can’t, cover every situation. The purpose was merely to make players aware of the variety of strategy considerations when approaching the reshuffle.

Pingback: The Reshuffle: A Strategy Guide | Megahaulin Blog for Star Realm Strategy