
Editor’s note: This is Part three of our Command Deck Strategies Series. We also recommend Part 1 on Fleet Director Nandi and Part 2 on BioLord Walsh.
Star Realms recently released the Command Decks feature into the digital app. This has lots of players asking, “How do we play them?” This guide is to help players understand the cards that come with the deck, including a broad overview of how to use them and some quick strategy tips to employ against each possible opposing commander.
Who should play overlord Newburg? Someone who can recognize a winning game state can preserve it with trade row control.
The Pact’s starting deck and gambits offer an advanced opening state. Blobs ships engage already hitting. Funded by the Trade Federation, we are also able to regenerate authority. We are predisposed into a head start in this race. Further Overlord Newburg comes with ready, built-in row scrap; we can meddle in the opening row and throughout the contest.
In just our first deck cycle, custom starters deal as much as 14 damage and can gain 5 authority. Early damage buys can find lethal as early as in the third deck cycle. Imagine in a game where we find, say, a Battle Pod, a Trade Pod, and a Cutter. Our second deck damage sum potential doubles to 29. By comparison, Admiral Le’s Alignment can only deal up to 12 stock damage, and is not equipped to regenerate. Our trade-light Le opponent might spend his first two turns investing in trade. Pact’s first and second cycle will already add up to as much 43 while the Le player is just now looking to find offense.
Here we can already discern an ‘up’ position: if the trade row were to evaporate, and we play the rest of the game without purchases, the math would play out in our favor.
In his second cycle the now trade-rich Le player will look for bombs. By that time we will hope to have cleared the row of impactful buys, thus effectively nullifying his potential gains before he can realize them.
To the point: If we can a) build on and hold a higher damage curve than our opponent AND b) neutralize cards in the row that threaten otherwise, then our opponent will have to either a) buy and incur bad cards in pursuit of good OR b) just watch our win play out.
The Starting Deck
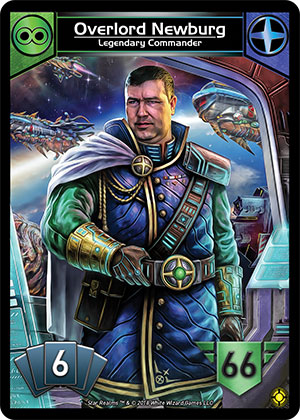
Pact comes with an 8-cost ship to shuffle into the Market Deck at the outset of the game, two gambits to set aside for use during the game, and a 12-card starting deck. You begin the game with 66 authority, instead of the normal 50, and a hand size of 6 cards, instead of the normal 5. You will start with 3 if you are the first player. Let’s examine each card you bring to the game:
Gambits
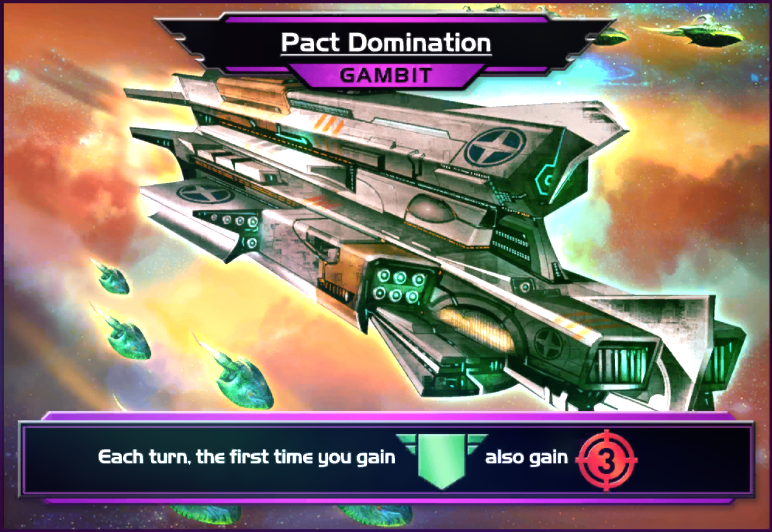
Pact Domination: This continuous effect incentivizes the Newburg player to gain authority by contributing 3 damage each turn he does. We have two stock ways to trigger this, one being our second gambit. We would like to acquire two or three more sources in most games, which will effectively guarantee triggering this on every turn. Maintaining a differential advantage relies on the activation of this at minimum once per deck cycle.
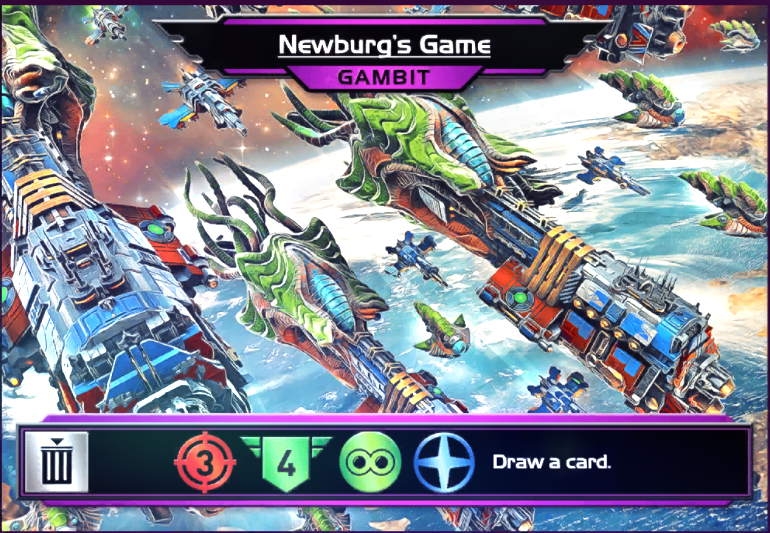
Newburg’s Game: This one-time-use deals 3 and heals 4 in addition to drawing a card. Of note, if the only authority gained the turn it’s used, it will also trigger Pact Domination for a total differential of 10!
Because we sit on a card draw, we are sometimes able to deliberately cause the shuffle. When going second, we are consistently offered this after turn two; the draw would isolate the cards in play (our second turn starters) into a new discard pile. Our new draw pile will contain our first turn starters, and more importantly, both turn one and turn two purchases. A trick traditionally more potent late game, in Commanders our aligned starters are already allying with cards we just acquired. Look for opportunities to propel your lead with an artificially boosted second deck.
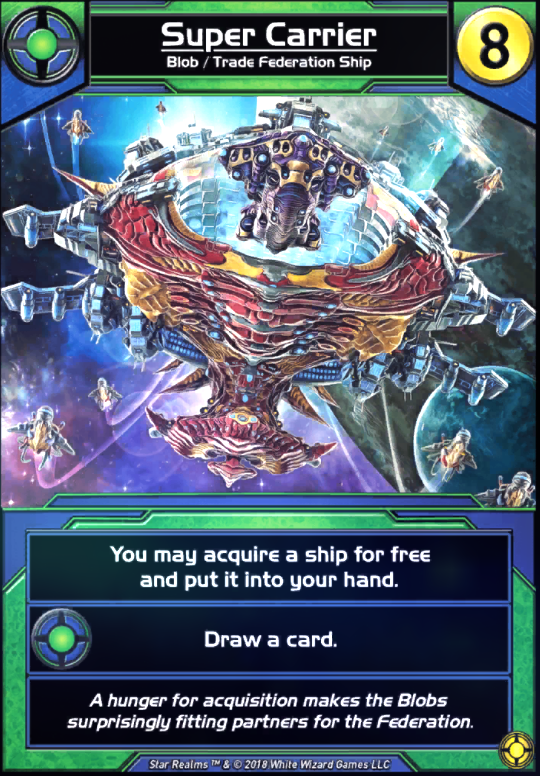
Super Carrier: This card is shuffled into trade deck before game. Certainly fun and powerful, this impactful bomb is often a liability. If you cannot purchase it, punch it as soon as possible.

Escort Viper: It’s better than a common Viper.
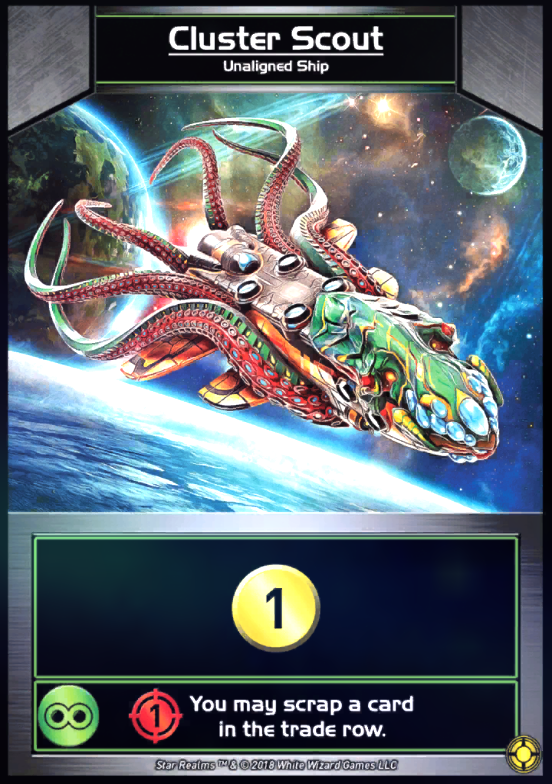
Cluster Scout: One of two row punchers in the build. In some situations we may even sac Newburg’s Game to ally it, and ensure a card’s exile. Make sure to activate and collect the damage, even if not punching.
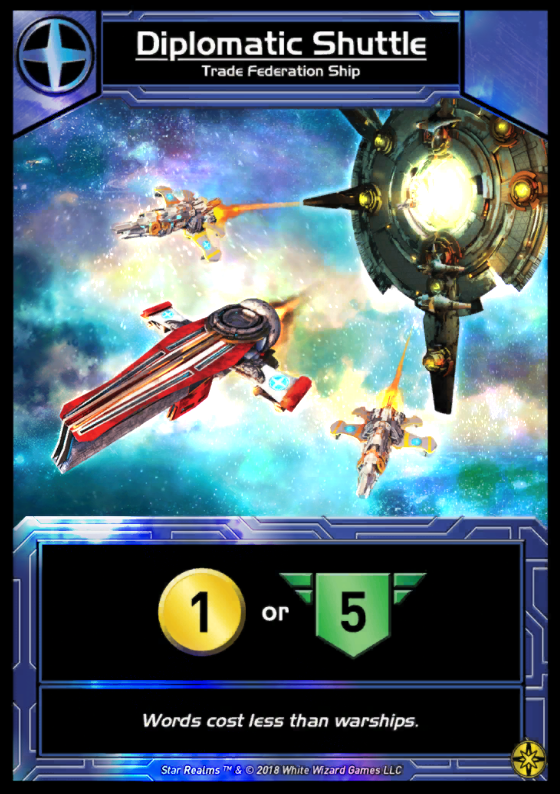
Diplomatic Shuttle: Our built-in access to realizing Pact Domination, we want to use this for authority almost every play. It is not uncommon for this card alone to generate 24 or 32 differential in a game. Purchases that warrant use of the trade option are extremely rare.

Frontier Tug: Look for opportunities to ensure allies meet or post up mid-shuffle. Topping can occur if without a draw pile, look for exploits. There are abundant inexpensive blue bases with authority gain, their value rises significantly with Pact Domination.
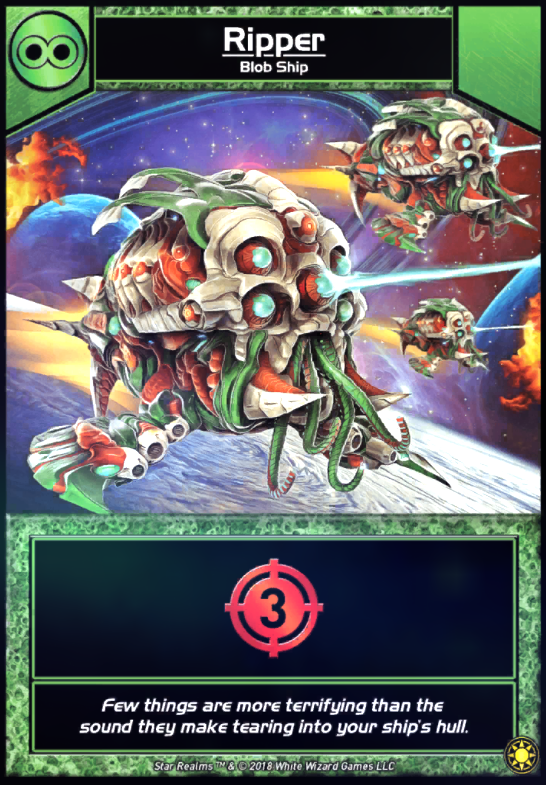
Ripper: It’s a Veteran Pilot that also allies your purchases.
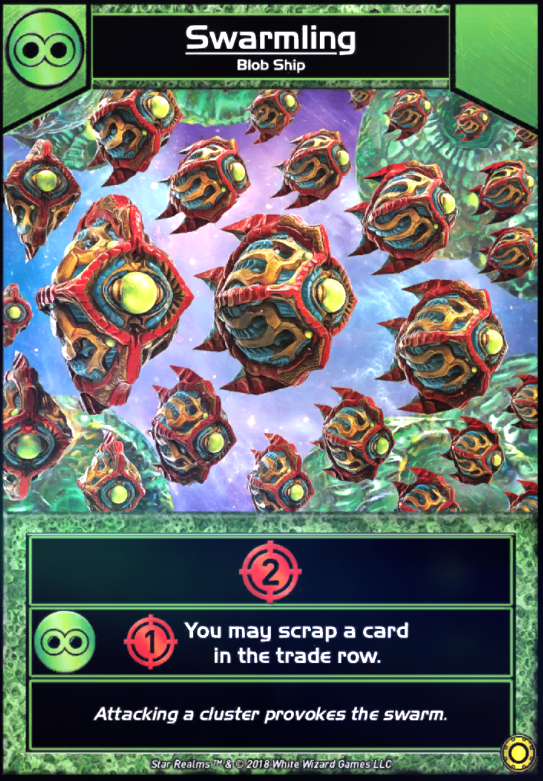
Swarmling: Our other puncher. Like the Cluster Scout, activate to get the damage whether or not you choose to refresh the trade row. We will focus on row manipulation strategy shortly.

Ranger: This is common to each aligned Commander (except the Lost Fleet). Hit for damage when you can. The versatility is useful, except that it cannot ally with your better cards. Hit for damage unless a purchase is necessary and impactful.
4 Scouts, 1 Viper – Common starters you know and almost love.
The Plan
Step 1: Bolster the Lead
Our aim in purchases should be to maximize our lead. Grab up as much additional offense as the row provides. Our own Blob ships are the most efficient in the game (damage output per trade spent to acquire). Trade Federation ships and even bases become more so with Pact Domination, as you can picture 3 damage next to each authority gain icon. Our hardest hitters by this standard include the Stinger and the Plague Pod, each offering 6 damage for a single trade at purchase. Other efficiency bargains include Swarmer, Battle Pod, Patrol Boat, and often the Lancer. Look also for speed via card draw in Blob Fighter, Predator, Assault Pod, and Burrower.
Step 2: Stall the Row
More than simply pushing out our opponent’s wants, we are in search of a row that is entirely incapable of changing game state. Categorize each slot in the trade row into five tiers of opponent desirability. If a card is of No Use, of Little Use, or Marginally Beneficial to him, leave it. We must instead either scrap or purchase cards that are Good, or Game Impacting.
You can leave marginally good for your opponent because even if purchased, are not likely to turn the game around on you next cycle. This is where we concede there is some risk in row punch. (an example might be a Survey Ship against Nandi. Punching it could reveal a Game Impacting Dreadnaught). We can even leave cards that are marginally good for us! If a row slot is of little or no use to our foe, the card there is already working on our behalf for free.
When the row contains no cards that are Good or Game Impacting for our opponent, we can consider it neutralized. Now our opponent will have to incur bad cards in the pursuit of a turnaround. Supplement your row scrapping starters to render and keep the row crappy! Spike Pod, Blob Miner, Ravager, Battle Screecher are all helpful.
Don’t I need at least some new trade?
Probably not. We are only looking at two deck cycles of buys before we hope to be lethal. The most efficient damage in the game is printed on small ships. We can easily double our total damage output with 1-4 cost Blobs. We can afford 5s and 6s right out of the box. The ability to purchase 7s and 8s outright may be a personal preference, or appropriate in context. Look to increase trade in cards that also contribute to damage: Cargo Pod, Pact Pod, Blob Bot, Ram, Crusher, Cutter, Security Craft.
What about Scrap?
We are hoping not to have enough time to. We certainly enjoy thinning to heroes and events. If we can anticipate that the matchup is likely to result in less than 4 deck cycles, acquired scrappers are likely to thin your deck by just one card. This sole offset may not be worth the purchase into Machine Cult, who cannot ally with the rest of our team. We are more open to red that packs hefty damage or can destroy a base. Consider scrap-to-thin in games against other blue commanders, where games may go significantly longer.
Can’t I go bases?
There is much more abundant cheap damage on ships than there are bases quite worth building a wall around. Utilize our Frontier Tug to near-top support in bases like Barter World, Outland Station, Nesting Ground, Defense Center. Between our speed and effort to control damage, we may consider taking no bases at all. As we may push our opponent into them, look for our many ways to cheat around them: Blob Destroyer, Pact Warship, War Kite, Moonwurm Hatchling, Frontier Ferry.
The Matchups
Divine Admiral Le – Alignment (Red/Yellow)
Starting Life: 64 Starting Damage: 12 No auth gain
As in our intro example, the Le player starts shy on trade. Punish him for going into it or bases. Horde up whatever damage we can. Scrap other damage and discard. Leave trade and inconsequential bases. Authority gain low in his own priorities, we are hoping to race this one out. If it does go long, discard might become a problem.
Biolord Walsh – Unity (Red/Green)
Starting Life: 70 Starting Damage: 17 No auth gain
One of two other commanders that compete with our damage, the Walsh player’s early buys might overtake our lead. Regain it with good purchases prior to shutting down the row. Be especially alert to punch impactful bases prior to your opponent using Walsh’s Stratagem. Then scrap damage that you cannot acquire. Leave trade and inconsequential bases. Make sure to hit our auth gain triggers.
Hive Admiral McCready – Union (Green/Yellow)
Starting Life: 60 Starting Damage: 16 No auth gain
The McCready player is hitting just a bit higher than we are at the start with a total capable single cycle potential of 21 damage. This includes his McCready’s Maneuver gambit. We still experience a differential lead with a total net offset of 26 when including Newburg’s game. That said, our lead is fragile; we will want to secure and control all of the offense we can. Punch any moderate to significant damage you can’t take. Leave cards without damage symbols. Make especially sure to hit our auth gain triggers as games with McCready very often come down to a turn. (or even a damage!)
High Director Valken – Coalition – (Red/Blue)
Starting Life: 62 Starting Damage: 17* Starting Auth gain: 7*
Damage and authority gain potentials above are asterisked because each requires the Valken player to meet multiple conditions. We open hitting harder, although we may be outgained in authority if our opponent effectively employs Coalition Efficiency. Consider going into Machine Cult for damage and scrap. Punch good red if you do not as well as authority gain you don’t buy. Leave trade and inconsequential bases. This matchup may take us into 5 or more deck cycles. Expect to have to deal up to twice your opponent’s starting life total.
Fleet Director Nandi – Alliance – (Yellow/Blue)
Starting Life: 68 Starting Damage: 6 Starting Auth gain: 7
The Nandi player is equipped to consistently and abruptly exploit high-cost cards. Look for additional row control and even some trade. Consider acquiring discard in lieu of punching it, as it is particularly punishing to our already short-handed opponent. Punch all impactful high-cost cards. Leave trade and inconsequential bases. If the Nandi player demonstrates a disinterest in taking Machine Cult cards, you may be able to flood the row with it. This matchup may take us into 5 or more deck cycles.
High Admiral Jochum – Lost Fleet – (Merc/Unaligned)
Starting Life: 72 Starting Damage: 7 Starting Auth gain: 5
Jochum’s daunting seven-card hand will gain favor in the long game. Entering the game with the least pre-defined strategy, the Lost Fleet opponent can develop into all different ways of defeating us. Work will be required as the Fleet begins with the least offense of any stock. Start by punching impactful bombs. Then adjust according to your opponent’s build. Leave low-cost ships and bases, preferably without docking or draw. Hoard and deny offense while he works around his shards. Keep the pressure on; a good Jochum build will snowball hard if allowed the time.
Overlord Newburg – Pact – (Blue/Green)
Starting Life: 66 Starting Damage: 14 Starting Auth gain: 5
We do not enjoy the starting advantage that we do over other commanders. We will have to generate and discern a clear lead before we would ever try and close off the row. Further our opponent will wield identical row punch control. Similarities aside, acquire damage like in every other game. If we get behind, resort our row scrap to search. If a Newburg opponent goes into scrap early, consider following. Mirror matches commonly go longer than four deck cycles.
Final Thoughts
You’re ready to win! As you get into games with the Pact and Overlord Newburg, keep these things in mind:
Play slowly!!
Especially if these are new cards to you. Think consciously through your plays to minimize simple mistakes.
You start the race in front.
Add to your lead with cheap early damage. You can potentially win in your third deck cycle.
You control the trade row.
The fastest reliable removal to date in Star Realms. Keep your opponent from getting started, then frustrate him all game long.
Do opponents respect the uphill battle versus the Pact? Our fleet is already attacking. Our Authority is steadily rising. Our row control is online and debilitating. They might find a few good buys. We will tamper enough to ride out our advantage.
Go Team Pact!

Pingback: Command Deck Strategies Part 4: The Lost Fleet and High Admiral Jochum | Megahaulin Blog for Star Realm Strategy
Pingback: Command Deck Strategies Part 4: The Union Command and Hive Admiral McCready | Megahaulin Blog for Star Realm Strategy
Pingback: Command Deck Strategies Part 6: The Alignment and Divine Admiral Le | Megahaulin Blog for Star Realm Strategy
Pingback: Command Deck Strategies Part 7: The Coalition and High Director Valken | Megahaulin Blog for Star Realm Strategy